Your Phone Adapter (ATA)
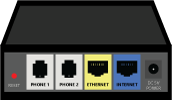
Before setting up your new phone service, it’s good to familiarize yourself with your new telephone adapter.
This box is called an ATA.

WARNING! DO NOT RESET!
On the far left of your Phone Adapter (ATA) is the reset button. We ask that you please DO NOT push this button unless instructed to by a technician. This will erase all information on the Phone Adapter (ATA) making it unusable until it is reprogrammed and we may have to send a technician out to your house for a service call.

Phone 1 & Phone 2 Ports
Use these ports to connect an analog phone (or fax machine) with an RJ-11 telephone cable. You will use the Phone 1 port, unless directed otherwise by us.

Ethernet
The yellow Ethernet port connects to your wireless router (Linksys, Belkin, Netgear, etc.). If you do not have a wireless router, this will connect directly to your computer.

Internet
The blue Internet port connects via Ethernet cable to the POE (the small black box) that serves as the power supply for the internet equipment on your house.

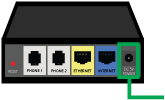
Power
The Power port is where you will connect the power adapter. The other end of this power adaptor should plug into a surge protector.
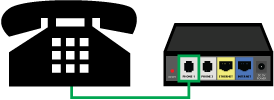
Step 1
Connect the RJ-11 phone cable from your phone to the Phone Adapter’s PHONE 1 port. If you have a second phone line, complete this step one more time for the PHONE 2 port.
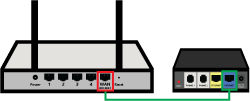
Step 2
Disconnect the Ethernet cable from the WAN / INTERNET port on your wireless router. Plug this end into the blue INTERNET port of the Phone Adapter.
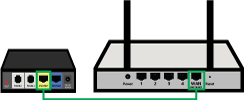
Step 3
Connect one end of the Ethernet cable included in your phone adaptor box to the yellow ETHERNET port of the Phone Adapter. Connect the other end to the WAN / INTERNET port on your wireless router.
Step 4
Connect the power adapter (included) to the Phone Adapters POWER port, and then plug the power adapter into a surge protector. The power LED on the front panel will light up as soon as the phone adapter powers on.

Step 5
Pick up the handset on your phone and verify that you hear a dial tone. Call NCI Datacom at 509-826-0300 to complete your setup.